Wednesday, July 23, 2014

SAP TABLE Joining using T-code SQVI

Introduction to SQVI:

SQVI is a tool for generating reports. SAP Query offers the user a whole range of options for defining reports. SAP Query also supports different kinds of reports such as basic lists, statistics, and ranked lists. SQVI on the other hand, is a tool that allows even relatively inexperienced users to create basic lists. I have created a tutorial for SQVI. SQVI Tutorial
SQVI Tutorial:
There might come a time that you want the information and it is spread in multiple tables. You can write a SQVI and get this information. In this tutorial we will write an SQVI to find out Role assigned to users with full name of the Users. You can get role assigned to users from AGR_USER table and Users full name from USER_ADDR. We will join both these table to get the result.
1.Execute the Transaction Code SQVI
2.Create a SQVI, give the name (z_user_Report) and Click on Created as show in the Fig.1
Fig.1: Create of SQVI

3. Provide the Title and Comments. Make sure that you have select Table join from Data Source    as show in  Fig 2a & 2b
                                                    Fig.2a Provide the Title and Comments                             
                                               Fig.2b: Selection of Data Sources

3. Click on insert tables option. Insert AGR_USERS and USER_ADDR tables as show in the fig.4.
                                                                             Fig.3: Insert Tables
4.Select the correct join. Here we will join BNAME as show in the Fig.4:

                                               Fig.4: Table Joining Phase
Hit Back Button

5. Here we will select Role name and user name from AGR_USERS table and Full name from USER_ADDR, and also make user name as the selection field. So when we run the query it will ask me to list the users as shown in the figure.5a.   
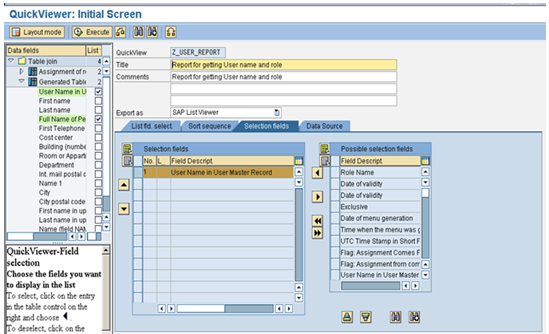
             
                                                 Figure.5a: Selection
                        Make User Name as the Selection as show in the Figure 5b
                          
                                        Figure.5b: Selection Field
6. Save the query and execute it. In the selection screen enter the user you want to get the info. You are ready with your SQVI query as show in the figure 6a, 6b
         Figure.6a: Execute with the user name

                                                         Figure.6b: Output

Hence, with the help of the tutorial now we are able to join the different tables with the Transaction Code SQVI
                                                   Follow me on Facebook Group:
                                              https://www.facebook.com/groups/sapall/
 

Tuesday, July 22, 2014

About SECATT Creation


              SECATT Script Creation Procedure: In SAP Implementation or System Migration Phase one of the major activities is User Administration, which includes user creation, setting initial password etc.
Suppose if there is a requirement of says more than 500
users ID creation. Imagine the efforts of using SU01.

The extended Computer Aided Test Tool (T code: SECATT) will help us accomplish our goal in very short time.
Go to SECATT Transaction code and execute the entire process in 4 different phases as shown in below
Phase-1
Recording the User Creation:
1. Enter the script name (Recommended to start with Z for easily identify)
2. Click on Create Icon.
Enter the following inputs:
3) Title:  MASS USER CREATION SCRIPT
4) Person Responsible will be back filled automatically and is normally the user who is creating the Script
5) Component: BC-SEC (OR ANY)
6) Click Save
 
7) Click on Pattern button
8) In Create Object Directory Entry Dialog box, Select Local Object
In next screen
9) Select AllCOMMANDS for Group
10) Select TCD (Record) for Command
11) Enter SU01 for Transaction and press Enter. The Interface will be displayed automatically as SU01_1
12) Click Continue Check Mark


In the next screen will record the activity of SU01, Ensure that we don’t click any options that are not required, since every click or entry is recorded. So we need to be cautious at this stage.

Upon clicking the continue check Mark, you will see the User maintenance screen (SU01).Follow the steps as we create a User ID and Click SAVE.

13) To end the Recording Click Back button in SU01 Screen Click Yes Button.

14) Then Click SAVE to save the recorded test Script


Phase- 2:
Creating the Parameters:
                   Once the user creation is recorded, the VALINs (values that were entered during the recording) should be changed to parameter values. The below process need to follow to create the parameters:
1) Double Click on interface SU01_1 to initiate the Stimulation.
2) Expand DYNPRO Mode
3) Expand 1st set of Screen
4) Double Click on Field Mode
5) Double click on the value that was entered (in this example test001)
                                   
6) Change the VALIN Name with a parameter name (to Zusername as show in the below example)
7) Click on Back Button
8) Select the Import when prompted with the parameter Maintenance Screen
9) Click Yes
10) Repeat the same steps for others values that are entered during the recording.
11) Once completed the task then click on SAVE Button.
Phase- 3:
Creating test Configuration:
1. Enter the Test Configuration Name
2. Click on Create Icon
3) Enter the description for the Test Configuration
4) Select the Component
5) Click Save
6) Select Configuration Tab.
7) Assign the script with the Test Configuration ZCONFIG_CREATE_MASS_USER (which previously recorded)
7) Save and execute the Test Configuration and follow the steps
8)Select Utlilities and Setting
9) Select eCATT Tab and External Tab
10) Change the path for Ecatt Objects, Variants and WebDynpro to Desktop
11) Download the Variants using the “Variant Download” button
Phase - 4:
Updating and Uploading the Variant File:
1) The variant file will be saved in the desktop.
2) Open the Variant file in Excel to modify / add user, now add the details of users in the file and save.
Save the file in the same Format (Since excel file can’t be read by the script)
3) Click on Variants Tab
4) Select the variant file.
5) Click Execute
Once the Script is Successful, you will see the Green logs.
Now you are set to create mass users, next time just update the Variant file with required detail and execute the Test Configuration (ZCONFIG_CREATE_MASS_USER).
You can also create templates for Roles & Profiles using this procedure.                                   We have created the Mass User Creation with the help of above steps similarly; we can create scripts for any mass changes like role modifications etc.
 
                                           Follow me on Facebook Group:
                                              https://www.facebook.com/groups/sapall/


Tuesday, July 15, 2014

Adding Authorization Objects Manually to the roles.

Manually Adding Auth Objects:

Normally it is not recommended to auth objects manually based on the requirement we can assign after having a proper approval from the authorized person.
The procedure for adding as follows:
1)

Mass Locking of the users using SU10

Mass Locking of the Users Using SU10:
Normally during maintenance or changes in system we will lock all the users using EWZ5 Transactions because of huge no of users. Alternatively we can lock all the users with the help of SU10 T-code. The procedure as follows:
1)Initially we need to get all the users list in the specific system/Client to get the details with the help of table USR02 in SE16 T-code.
2)Once we have the list of all the users to lock go to T-code SU10.
3)Now we have a some users to test it. Just click AUTHORIZATION DATA then give all the user ids list and then execute it.
4)Then above screen will shown simply select all the users and click on Transfer.

5)Finally the above screen will simple we can lock all the users after the upgrade or changes done by basis guys we can use the same list to unlock the user
 
Follow me on Facebook Group:
                                              https://www.facebook.com/groups/sapall/


Friday, July 11, 2014

SAP Role Upload and Download...

 SAP Role Upload and Download:

Normally this part of Role Upload and Download is used when we need to Upload a Role from one system to another system or Client to another Client to copy the roles. This is the main purpose of the role upload.
The Procedure of Role Download as follows:
1)Initially we need to identify the role, Source and target Systems which we need to Download and Upload.
2)Once done then go to PFCG then provide the role then  ROLE TAB --->DOWNLOAD( CTRL+F11)Option.
Once download the below screen will appear.
Then save the Role in a desired Location on the desktop.
The view of the role  on the desktop as follows
3) This is the process of Role download process.
Role Upload Process:
Similarly like role Download Process:
1)We need to go to PFCG Transaction then go to ROLE TAB --->UPLOAD( CTRL+F12)Option.
2)Copy the desired role from the desktop when we have downloaded.
3)The following screen will appear simply click on execute button.
                                                The following message will come once it is uploaded.
 
                                                    Follow me on Facebook Group:
                                              https://www.facebook.com/groups/sapall/


Thursday, July 10, 2014

About the STAUTHTRACE Transaction Code

Transaction Code:STAUTHTRACE:

This transaction STAUTHTRACE is also the new system trace option replace of ST01.Its very fixable to use the transaction entire trace process can be handle in one screen :)

The procedure as follows:

1)Execute the Transaction STAUTHTRACE the view of the screen as show below.

 2)Provide the Username at Trace Options(Trace of user Only)which we can to trace the user.
3)Then Activate the Trace Option.
4)Ask the user to do the facing activity.
5)Once done we can update the details at Restrictions for the Evaluation with the details like User ID, Date and Time then Execute it.
6)Then result of the missing Auth Object will get.

                                               Follow me on Facebook Group:
                                              https://www.facebook.com/groups/sapall/ 

SAP System Trace

SAP System Trace:

 This is a also a normal task for SAP Security Admin but need to be very active for this type of issues. Most of the time P1 type of task is coming for System Traces so need little more active on this task. Once the ticket is raised we need to ask for SU53 screen shot to trouble shoot the issue if still not able to solve then we can go with System Trace task.
  • Initially we need to call the End user who ever is facing and based upon his/her availability we need to arrange the call to resolve the issue.
  • Then we need ask the user to come out of the system. For reference we can check with the help of transaction code AL08 if the user is logged or not and copy the server name.
  • Once done then we need to go to SM51 then go to Remote login to the system.
           
  • Then use the transaction ST01 we need make the following change as show below screen shot.
  • Once change done Please save it. Then Click on Trace on Button(F7).
  • Ask the user to try again which ever he is facing the auth issue.
  • After completing his work we can execute result with the help of Analysis (F2)button.
  • Then give the details of the user with time and date as show in the screen shot. Then execute (F8) it.
  • Based on the Test result we need to give the missing auth object to the users.Some of the important code in the report are as follows
  • If the return code 0 Means the Auth object is successful
  •  If the return code 4 Means the required auth for the auth is not available in the user master
  • If the return code 0 Means that no authorization for the auth object is available.              
                               Follow me on Facebook Group:
                             https://www.facebook.com/groups/sapall/


Wednesday, July 9, 2014

SAP Role Administration Activity

SAP Roles:

           The users can be accessed based on the level of authorizations provided by the Administrator. The level of access provided to the user are given by the management person and the access is given by the SAP Security Administrator. In this person can be carried out through the Role Administration which is the key for any user access and the activity level and field levels can be restricted with the help of Authorization part.
Initially in this post i am going to discuss on Role creation since in the previous post we had discuss on user admin part.
Role creation Procedure:
1)Initially based on the requirement from the client we can work on it further.
2)After getting approval from them we need to work.
3)Execute the transaction PFCG the view as shown below.

4)Provide the Name as required like normally will start with ZSR-for Single or Master Role, ZCR-For Composite role
5)Once name is decided we need click on Single or Comp button as required and include the description.
6)In Menu Bar add the Transaction as desired.
 
7)In Authorization Tab restrict the auth part and in User Tab part assign the required users.
 
 
Follow me on Facebook Page for SAP Security Issues: 
https://www.facebook.com/groups/sapall/ 


Tuesday, July 1, 2014

Password Reset Procedure in SAP.

This is another normal ticket which frequently SAP Security Consultant are getting and max no of tickets getting into our que.
This is simply which we can complete in 2 steps.

1)we need to identify the user id for password reset and then go to su01.
2)Then Click on Change Password Button(Shift+F8).

3)Then it will prompt to a new screen as shown in the below screen  and provide the new password.
 
4)Then sent the new credentials to the requested users.
 
Note Points:
Important issues frequently on this task: 
1)"Password is in exception table" This error message is caused due to the given password is in the exception list we need to provide alternative password we can check with the help of table USR40.


Follow me on Facebook Page for SAP Security Issues: 
https://www.facebook.com/groups/sapall/